How to use Caddy with Cloudflare's SSL settings
Last updated April 4, 2023 — Published July 10, 2020
Configuring Cloudflare can be quite difficult. There are many settings for proxying and SSL that can be fairly confusing if you don’t understand what they do or how to configure them on your web server. And while there are plenty of tutorials out there explaining how to use configure nginx or Apache for Cloudflare, there aren’t really any that explain how to configure Caddy.
Table of contents
Configuration with reverse proxy disabled
First, you should check whether Cloudflare’s reverse proxy service is being used for your website. In your Cloudflare dashboard, go to your website’s DNS settings. If the cloud icon in the proxy status column is greyed out, like in the image below, then Cloudflare’s reverse proxy will be turned off for your website. If this isn’t the case and you are using their reverse proxy, then you can skip to this section.
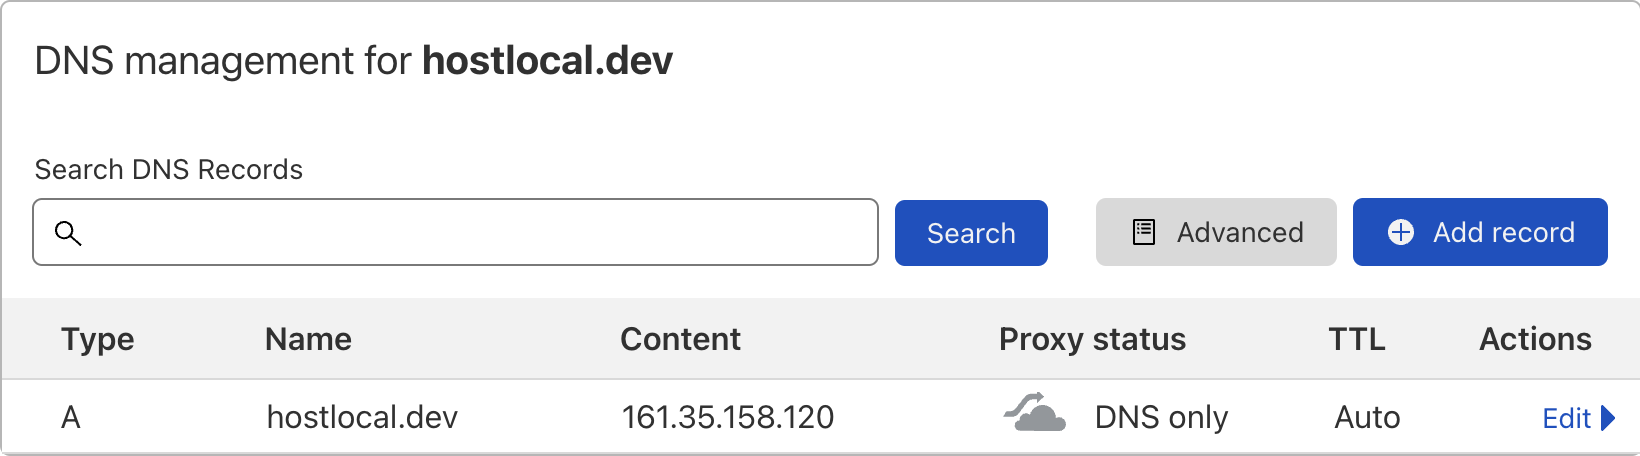
This means that you won’t be using their CDN and that the vast majority of features in your Cloudflare dashboard won’t work. Visitors will be routed straight to your origin server and Cloudflare will basically only act as a DNS provider for your domain.
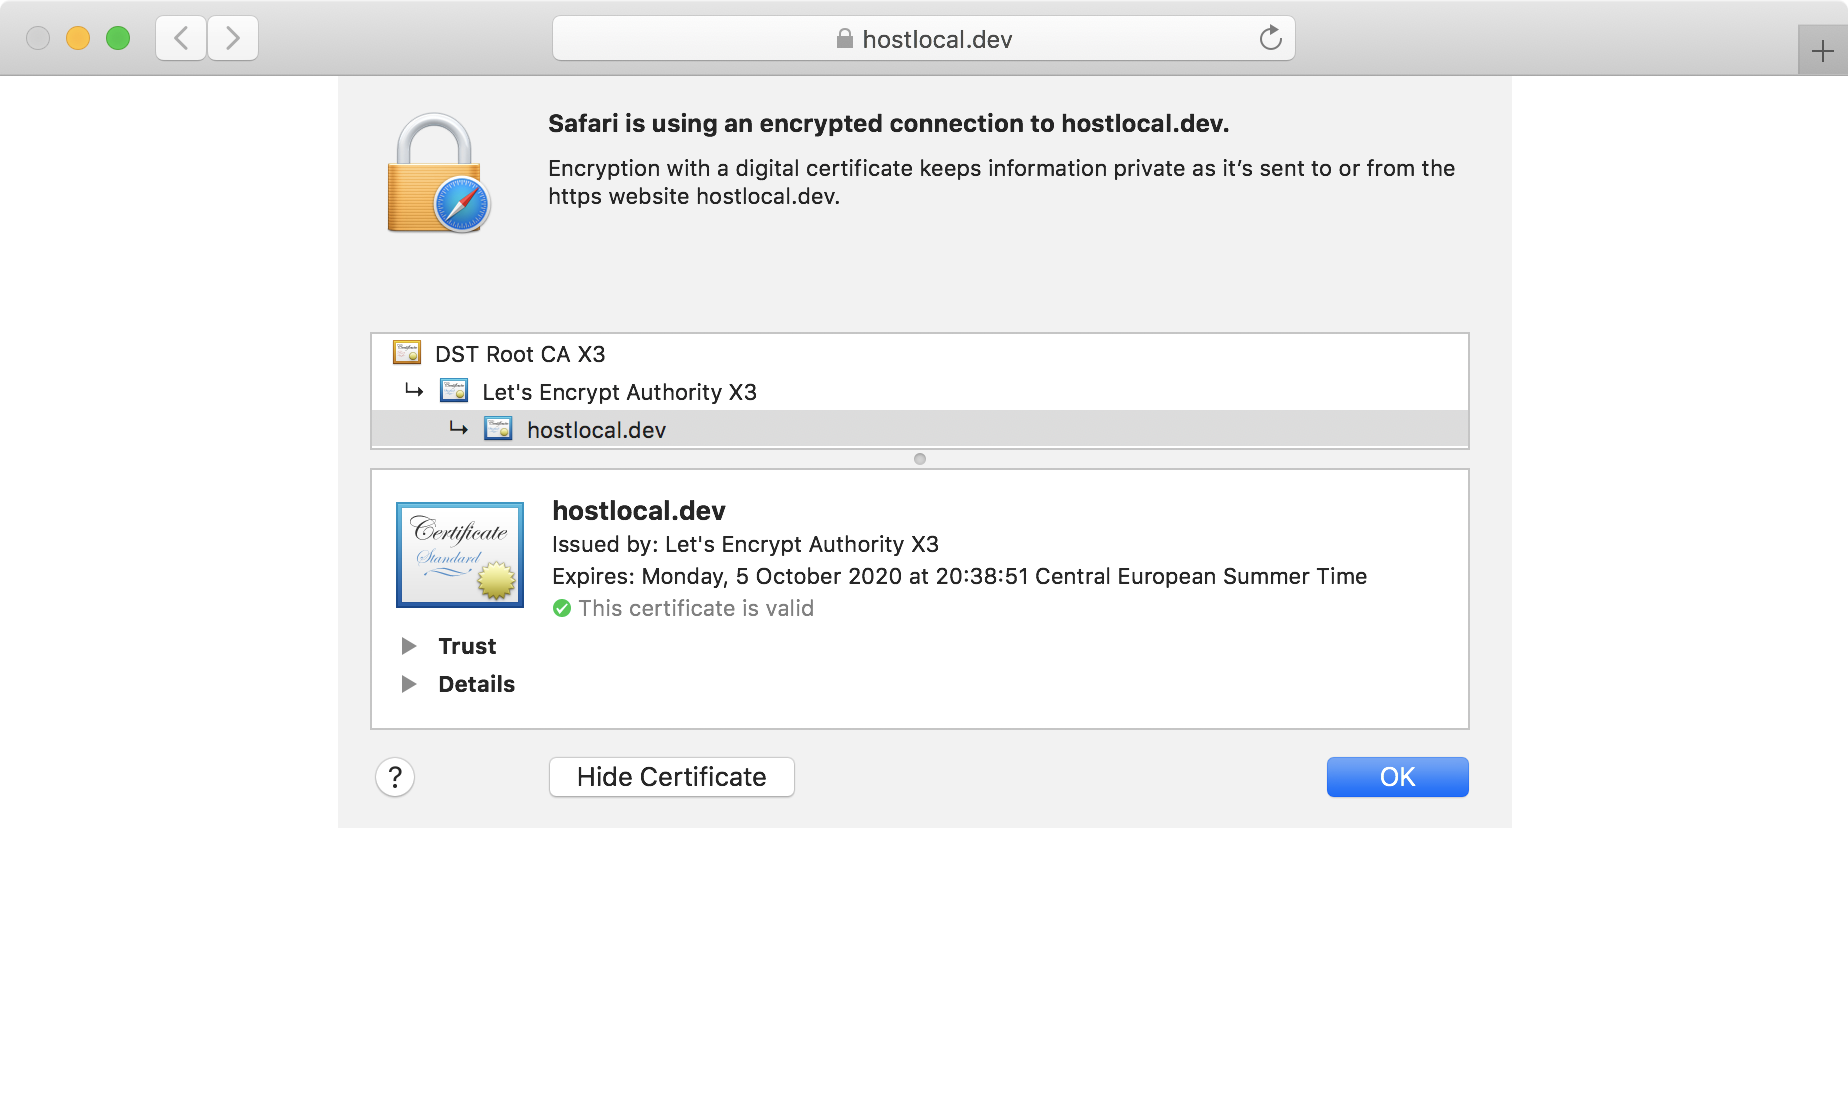
As the SSL certificate won’t be served from Cloudflare anymore, you’ll need Caddy to serve a valid SSL certificate for you. Luckily, Caddy’s automatic HTTPS feature automatically obtains and renews SSL certificates from Let’s Encrypt. Add your site’s address to your Caddyfile, which is the configuration file for Caddy, and start Caddy with caddy run.
For example, this is what my Caddyfile looks like:
hostlocal.devAnd this is what my site looks like:
Configuration with proxy enabled
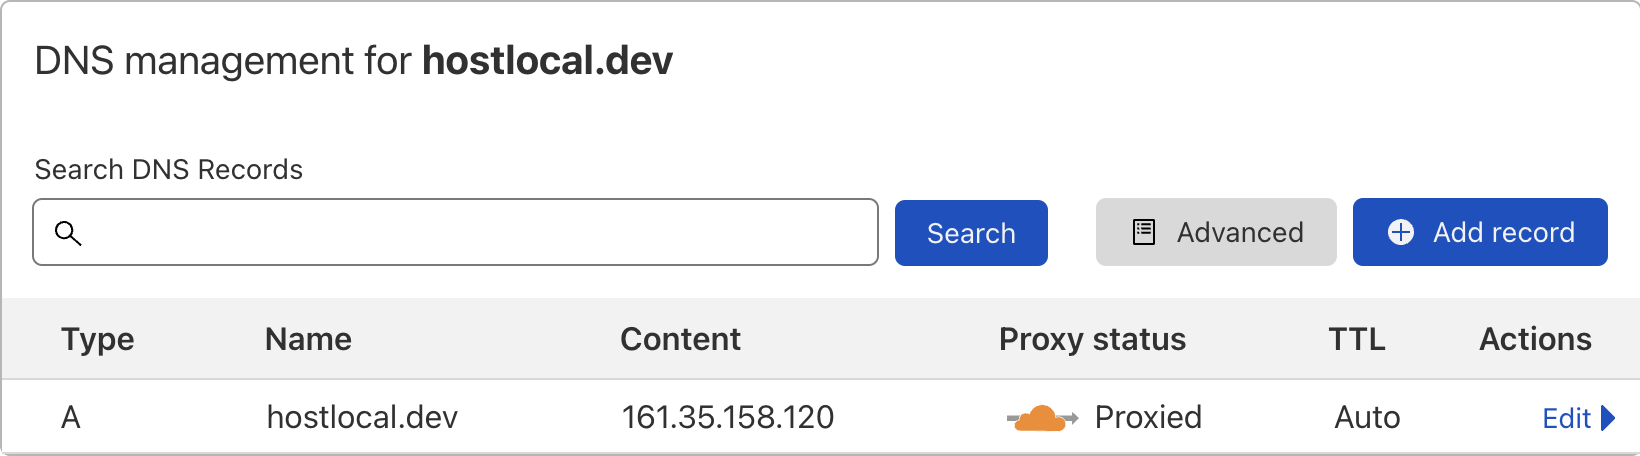
If the cloud icon in the proxy status column is orange, then Cloudflare will act as a reverse proxy for your web server and you’ll have access to their CDN. Visitors will now visit your site through a Cloudflare server.
This slightly complicates the SSL situation. Cloudflare issue their own certificates that will be used by their reverse proxy servers, which will now be sitting in front of your origin server. This will be used to encrypt traffic between visitors and Cloudflare. You can see this certificate in the edge certificates tab of the SSL section of your dashboard. There are a number of encryption modes to choose from in the SSL section of your dashboard, of which I’ll be covering two: the full and full (strict) modes. I will not be covering the other modes, off and flexible, as they are not recommended for security.
The difference between the full and full (strict) modes is that the certificate for the strict mode has to be signed by a Cloudflare trusted certificate authority (CA), while the standard full mode can have a self-signed certificate. Both options ensure that the traffic between the client and Cloudflare as well as the traffic between Cloudflare and the origin server is encrypted. At no point will HTTP be used.
You have three options when it comes to choosing a certificate for your origin server:
-
Use Cloudflare issued origin certificate
You can generate an SSL certificate in the Cloudflare dashboard that can be configured like any other certificate. This certificate can be valid for up to 15 years, so it won’t require much maintenance either. However, these certificates are only trusted by Cloudflare, so your site won’t work when you disable the proxy.
Like with Let’s Encrypt, this option also works with the full and full (strict) modes.
-
Use Caddy’s automatic HTTPS feature with Let’s Encrypt
This option requires some extra work. The origin server will not be able to pass the ACME HTTP-01 challenge presented by Let’s Encrypt due to verification complexities that the Cloudflare proxy create. An alternative is to instead use the ACME DNS-01 challenge that verifies domain ownership by asking you to create a TXT DNS record and then checking your DNS records to see if it can find a match. All of this can be automated by using a version of Caddy with the Cloudflare module and by creating a Cloudflare API token.
The main benefit of using Let’s Encrypt is that you can bypass or turn off Cloudflare’s proxy and users will still be able to visit your site as you will have a certificate from a trusted CA.
This will work with the full as well as the full (strict) mode.
-
This is only an option if you are using the non-strict mode. Like the Cloudflare issued certificate, a self-signed certificate will not be trusted by a browser, so your site will not work if you disable the proxy.
If you don’t know which option to choose, think about the following question: do you think you will continue using Cloudflare’s reverse proxy for the foreseeable future? If the answer is yes, then using Cloudflare’s certificate will work just fine and is easier to configure. Otherwise, if you think you might have to turn off Cloudflare’s reverse proxy and you still want your website to be accessible, then you should use a Let’s Encrypt certificate.
1. Using Cloudflare’s origin certificate
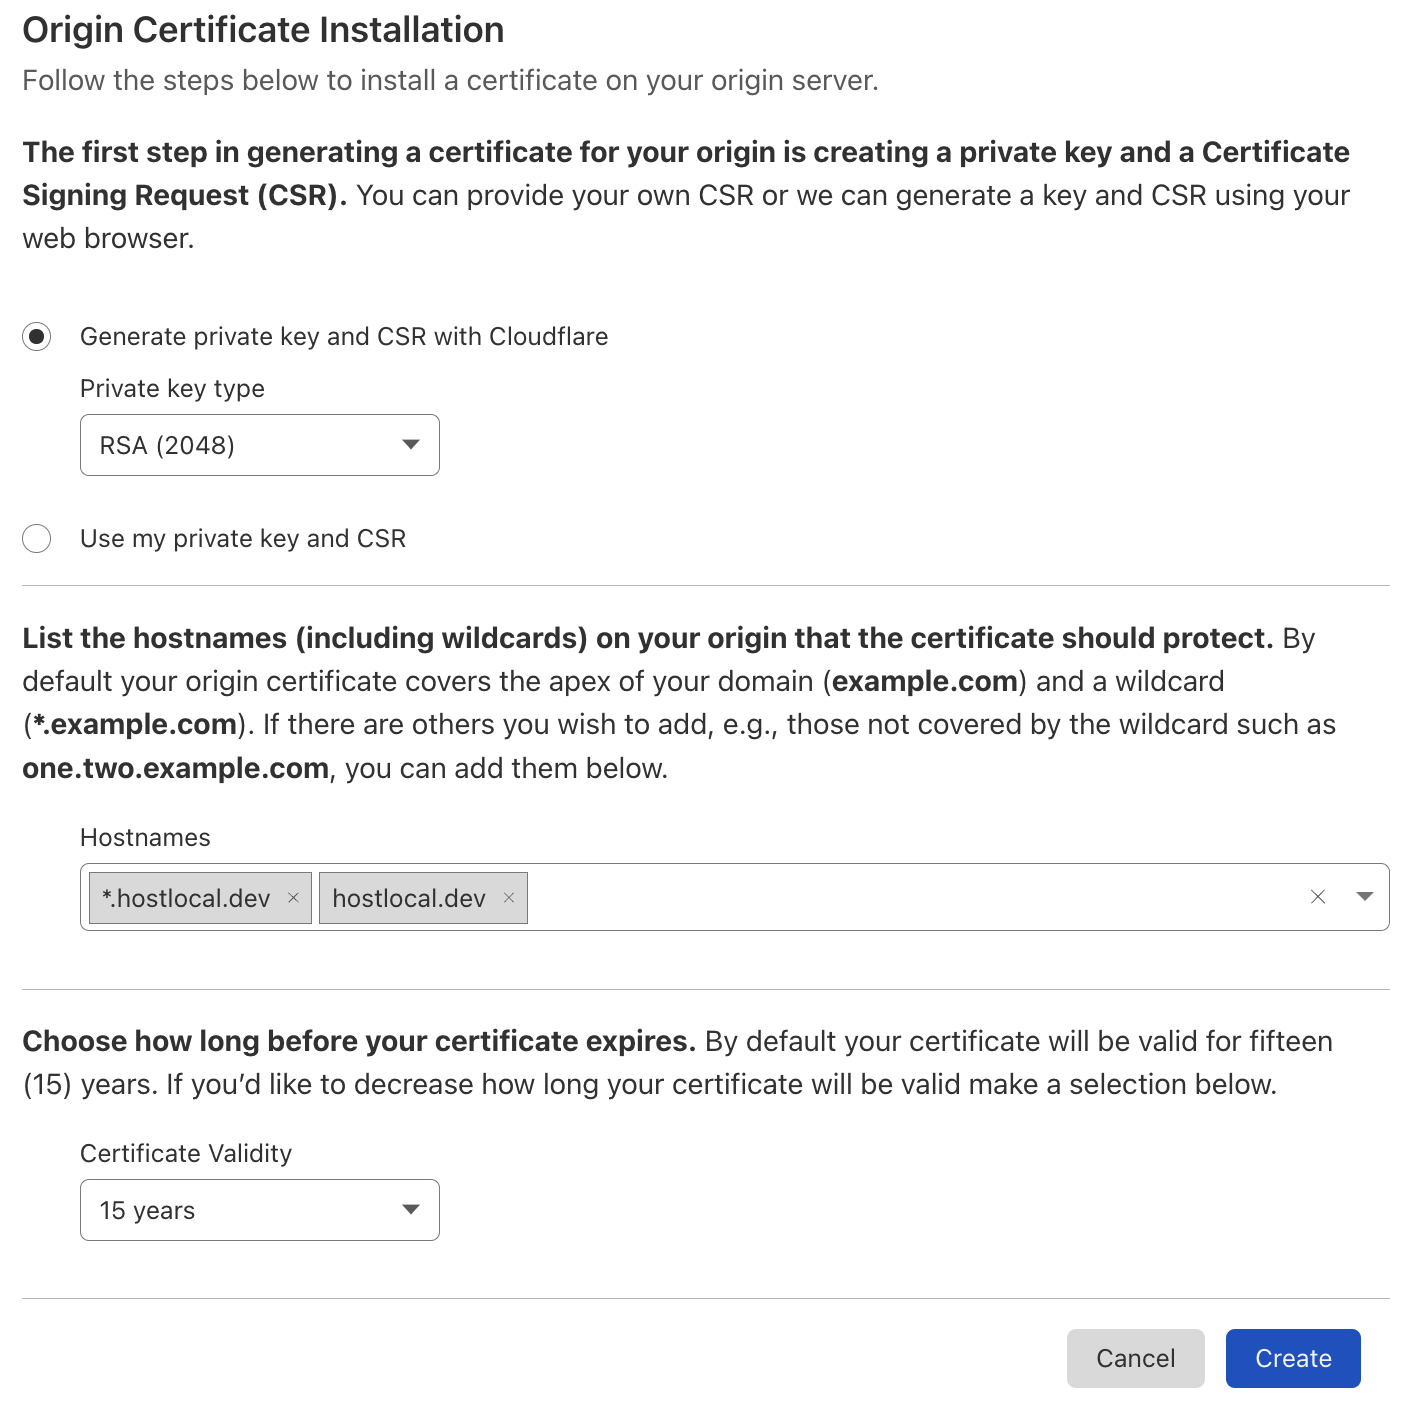
Go to origin server tab of the SSL section of your domain’s Cloudflare dashboard. Click on create and leave the options as they are, i.e. let Cloudflare generate a private key and a CSR with the key type as RSA and a certificate validity of 15 years.
The next modal window will contain the certificate and the private key. Leave the key format as PEM and paste the certificate contents into /etc/ssl/certs/certificate.pem and paste the private key contents into /etc/ssl/private/key.pem.
Now configure Caddy to use the certificate and private key by adding the following directive to your site in your Caddyfile:
tls /etc/ssl/certs/certificate.pem /etc/ssl/private/key.pemFor example, this is what my Caddyfile looks like:
hostlocal.dev {
   tls /etc/ssl/certs/certificate.pem /etc/ssl/private/key.pem
}
Now run Caddy with caddy run and you should see a Cloudflare certificate on your website.

2. Using a Let’s Encrypt certificate
For this option, you’ll need to compile Caddy with the Cloudflare module which means you’ll need to install Go if haven’t already. My instructions, which are straight from the Go website, will be for Linux, but you can still follow these instructions if you need to install it on a different OS.
Update: Caddy now has a download page for the v2 version, where you can also select modules to include in your build. We’ll be using that instead of compiling a custom build as it’s a lot easier to use.
Visit the Caddy download page, select your platform and architecture and scroll down to select the cloudflare DNS provider module.
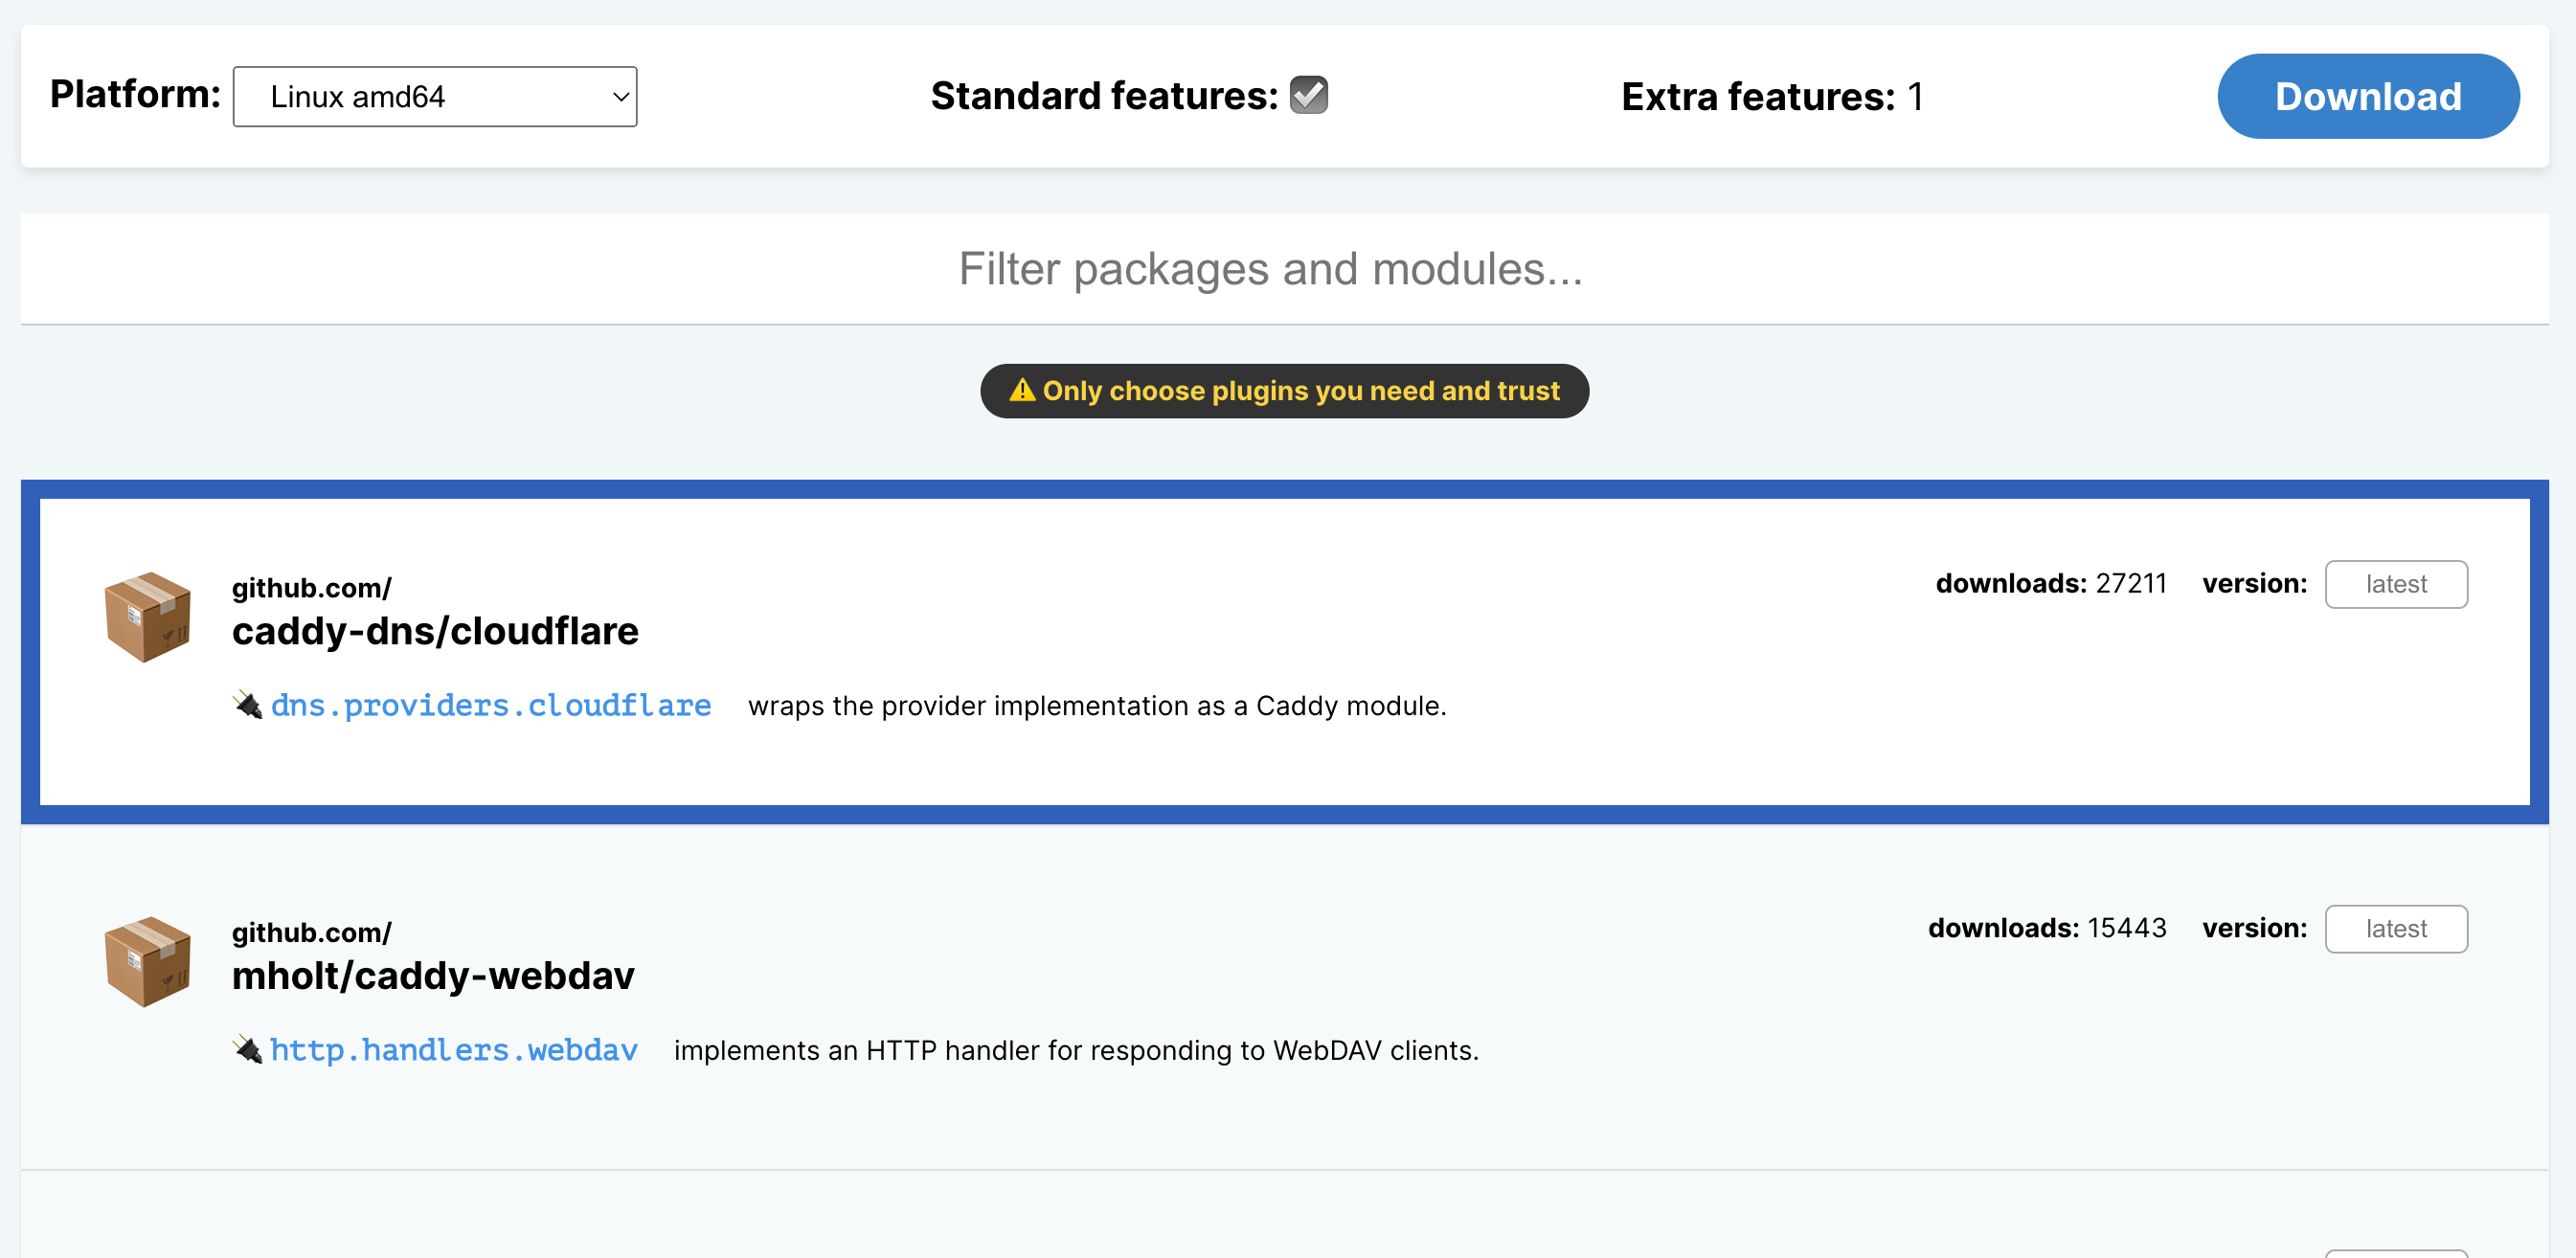
Now, right click the download button and copy the link address. Replace the URL in the following command with the link you just copied so we can download the custom binary:
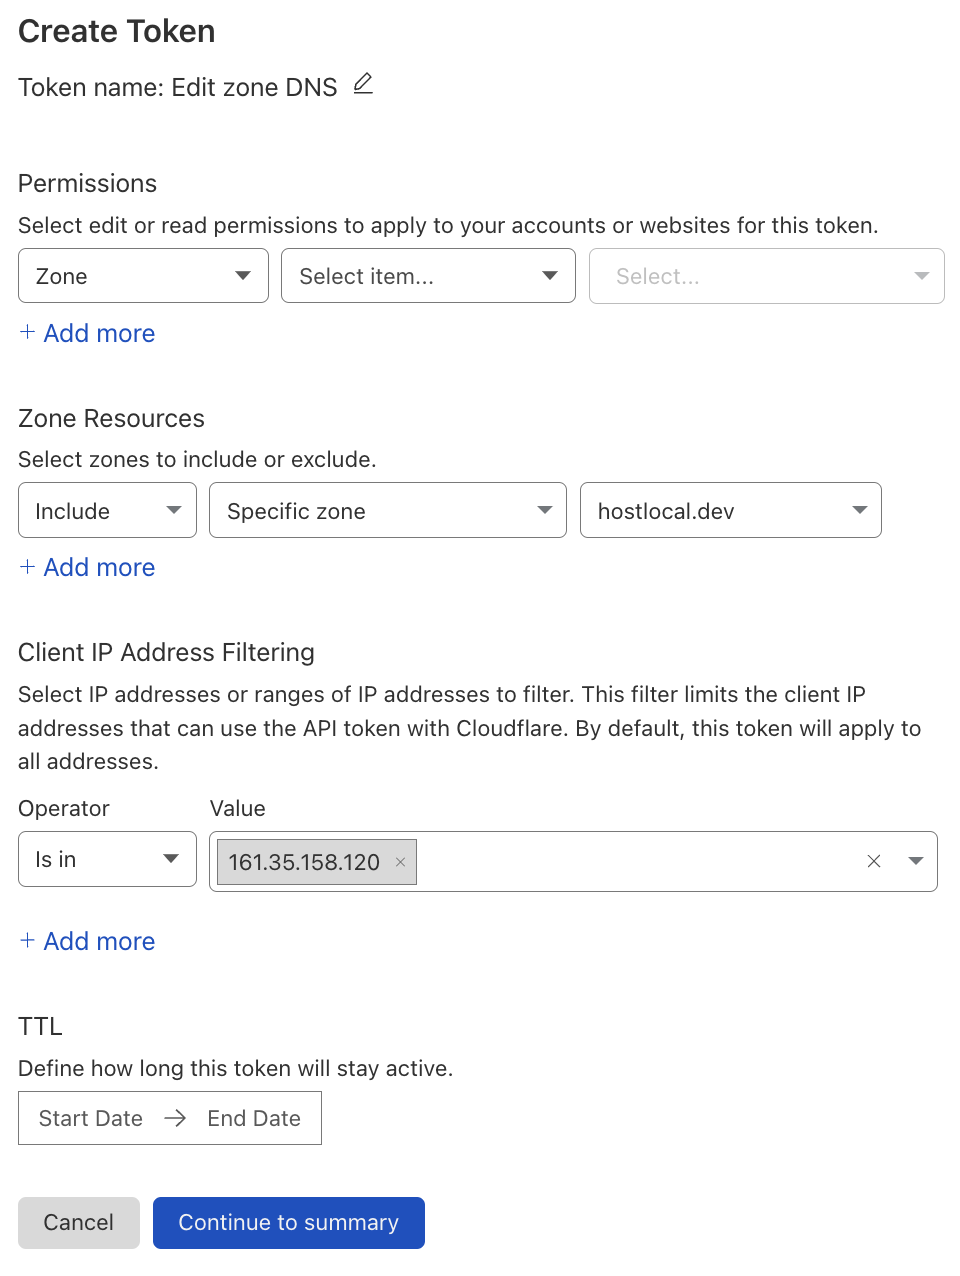
sudo curl -o /usr/bin/caddy -L https://caddyserver.com/api/download?os=linux&arch=amd64&p=github.com%2Fcaddy-dns%2Fcloudflare&idempotency=79288222921372All that is left now is to configure Caddy with a Cloudflare API token, which you can create by clicking on “my profile” on the top right of your Cloudflare dashboard and then clicking on the API tokens tab. Click on create token and then use the edit zone DNS template.
Select your website in the zone resources section. For example, I will be selecting hostlocal.dev. You can leave the other options as the template already configured them properly. If you are sure that your Caddy server’s IP address won’t be changing any time soon and you want to be extra safe, then you can limit the token to that IP address by entering it in client IP address filter.
Continue through the creation process until your API token has been created. Copy the API token and add it to your environment variables with the following command:
echo "export CLOUDFLARE_AUTH_TOKEN=TOKEN_HERE" >> ~/.bashrc
source ~/.bashrc
Now configure your Caddyfile as followed to use the Cloudflare module with your API token:
hostlocal.dev {
   tls {
      dns cloudflare {env.CLOUDFLARE_AUTH_TOKEN}
   }
}
Start Caddy with caddy run and you should see that it successfully solves the DNS-01 requests in the logs.
3. Using a self-signed certificate
The easiest way to do this is by using tls internal in your Caddyfile, which will use a certificate that is signed by a locally trusted CA. This option also requires no extra maintenance work as that’ll be done by Caddy. In my case, this is what my Caddyfile looks like:
hostlocal.dev {
   tls internal
}
If you need a self-signed certificate, you can create one with a private key with the following command that I got from this IBM tutorial:
openssl req -newkey rsa:2048 -nodes -keyout /etc/ssl/private/key.pem -x509 -days 365 -out /etc/ssl/certs/certificate.pemNote that the certificate will only be valid for a year. You can change the days argument to extend the validity of the certificate.
Add the tls directive to your Caddyfile so it looks like this:
hostlocal.dev {
   tls /etc/ssl/certs/certificate.pem /etc/ssl/private/key.pem
}
Now run Caddy with caddy run.
Authenticated origin pull
This feature ensures that when an “origin pull” is made to update the CDN cache, that the request being made to your origin server is from Cloudflare and not a different source. Cloudflare have written a good article about this here.
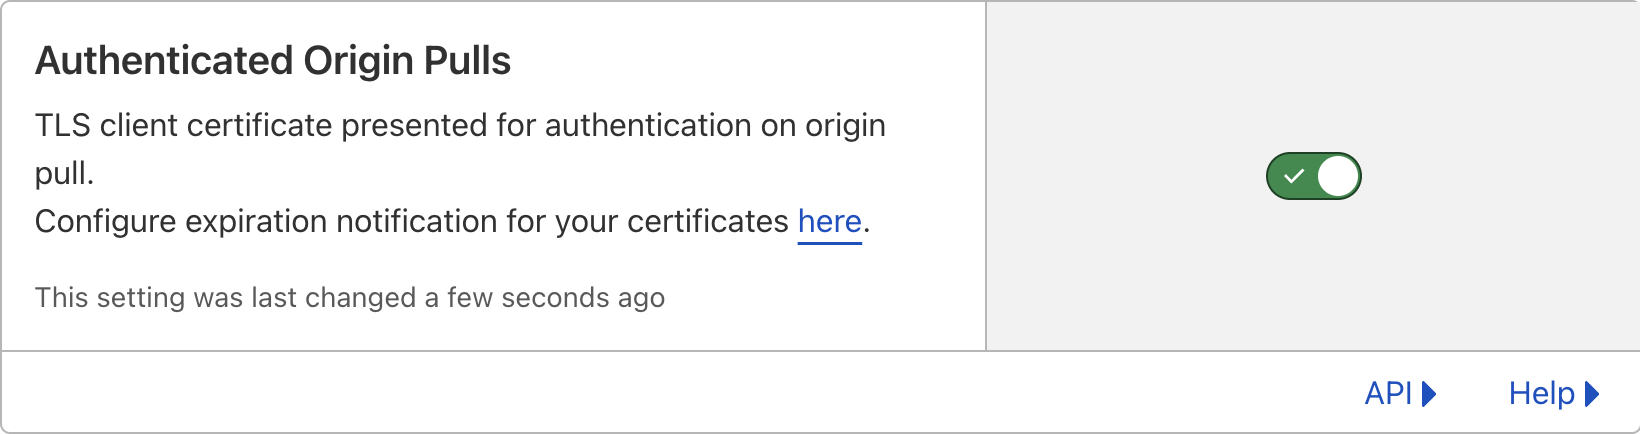
You can enable authenticated origin pulls by going to the SSL/TLS section of your domain, going to the origin server tab and then toggling the switch for authenticated origin pulls.
To configure authenticated origin pulls, download the Cloudflare CA file to /etc/ssl/certs.
Note that the download link might change in the future. You can find the latest link at the end of this Cloudflare article.
curl -o /etc/ssl/certs/origin-pull-ca.pem https://developers.cloudflare.com/ssl/static/authenticated_origin_pull_ca.pemYou can now configure Caddy to verify client certificates with the Cloudflare CA and otherwise block the request if the client doesn’t present a valid certificate or any at all. Add the following to your tls directive in your Caddyfile:
client_auth {
   mode require_and_verify
   trusted_ca_cert_file /etc/ssl/certs/origin-pull-ca.pem
}
This is what my Caddyfile looks like now, configured with a Cloudflare issued certificate and authenticated origin pulls:
hostlocal.dev {
   tls /etc/ssl/certs/certificate.pem /etc/ssl/private/key.pem {
      client_auth {
         mode require_and_verify
         trusted_ca_cert_file /etc/ssl/certs/origin-pull-ca.pem
      }
   }
}
You can now run Caddy with the caddy run command.
Resources
- https://developers.cloudflare.com/ssl/origin/ssl-modes/
- https://support.cloudflare.com/hc/en-us/articles/360023792171-Getting-Started-with-Cloudflare-SSL
- https://support.cloudflare.com/hc/en-us/articles/115000479507-Managing-Cloudflare-Origin-CA-certificates
- https://community.cloudflare.com/t/lets-encrypt-acme-challenge-with-cloudflare/103109/3
- https://letsencrypt.org/docs/challenge-types/
- https://support.cloudflare.com/hc/en-us/articles/204899617
- https://caddyserver.com/docs/caddyfile/directives/tls
- https://caddyserver.com/docs/build#xcaddy
- https://golang.org/doc/install
- https://blog.cloudflare.com/origin-server-connection-security-with-universal-ssl/
- https://www.ibm.com/support/knowledgecenter/SSMNED_5.0.0/com.ibm.apic.cmc.doc/task_apionprem_gernerate_self_signed_openSSL.html
- https://developers.cloudflare.com/ssl/origin/authenticated-origin-pull/
- https://developers.cloudflare.com/ssl/origin-configuration/authenticated-origin-pull/set-up/zone-level/
